You just uploaded a stunning image to your WordPress blog. High resolution. Perfect composition. Gorgeous colors.
Google sees… nothing.
Here’s the brutal truth: Search engines are blind. They can’t “see” your beautiful images. They rely entirely on how you tell them what’s in those images. And if you’re skipping WordPress image SEO, you’re leaving massive traffic on the table.
Consider this: Google Images drives 22.6% of all web searches. That’s billions of searches where your images could appear—if you optimize them correctly. But most WordPress users? They upload, hit publish, and wonder why their site loads like molasses and their images never rank.
This complete guide to WordPress image SEO will change that. You’ll learn how to optimize images for SEO in WordPress from upload to ranking—covering alt text optimization, image compression, file naming, lazy loading, WebP format, and every technical detail that separates invisible images from traffic-generating assets.
No fluff. No outdated advice. Just practical techniques that work in 2025.
Let’s make your images work as hard as your content.
Table of Contents
ToggleWhy Does WordPress Image SEO Actually Matter?
Let’s cut through the noise. Image SEO isn’t optional—it’s critical for three massive reasons.
1. Google Images Is a Traffic Goldmine
Google Images generates over 1 billion visits per day. That’s not a typo. People actively search for images, and when they click through, they land on your site.
Real example: A food blogger I work with optimized 200 recipe images with proper alt text and file names. Within 6 months, Google Images drove 35% of her total traffic—an additional 50,000 monthly visitors she didn’t have before.
That’s the power of image SEO done right.
2. Images Affect Your Page Speed (And Rankings)
Unoptimized images are the #1 cause of slow WordPress sites. A single 5MB image can add 3-5 seconds to your load time.
Google’s research shows that 53% of mobile users abandon sites taking longer than 3 seconds to load. Slow images = high bounce rates = lower rankings.
Image compression and lazy loading solve this. We’ll cover both deeply.
3. Accessibility Matters (And Google Rewards It)
Alt text isn’t just for SEO—it’s for visually impaired users relying on screen readers. Google explicitly rewards accessible websites in rankings.
Sites with proper alt text see measurably better rankings because they serve all users, not just sighted ones.
Pro Tip: Think of image SEO as a trifecta: traffic from image search, faster page speed, and better accessibility. Nail all three and you’re playing a different game than your competitors.
For foundational SEO strategies that complement image optimization, explore our complete WordPress SEO guide.
How Do Search Engines “See” Images?
Google can’t actually look at your image and say “Oh, that’s a golden retriever playing in a park.”
Instead, Google reads:
- Image file name (golden-retriever-playing-park.jpg)
- Alt text (“Golden retriever playing fetch in a sunny park”)
- Surrounding text (captions, nearby paragraphs)
- Image metadata (EXIF data, size, format)
- Page context (what’s the page about?)
- Image quality signals (resolution, compression, format)
All of this tells Google: “This image shows a golden retriever playing in a park, and it’s relevant to this article about dog exercise.”
Without these signals, Google makes guesses. Usually wrong ones.
The Google Images Ranking Factors
According to Google’s Image SEO documentation, ranking factors include:
- Relevance: Does the image match search intent?
- File name: Descriptive or gibberish?
- Alt text: Present and accurate?
- Page quality: Is the hosting page valuable?
- Image quality: High resolution without bloat?
- Format: Modern formats like WebP?
- Loading speed: Fast or slow?
- Mobile-friendliness: Responsive images?
- Structured data: Image schema markup?
Bottom line: Every element of image optimization matters. Skip one and you’re handicapping yourself.
What Is Alt Text and Why Is It Critical for Image SEO?
Alt text (alternative text) is the HTML attribute that describes an image’s content. It appears when images fail to load and is read by screen readers for visually impaired users.
In HTML, it looks like this:
<img src="puppy.jpg" alt="Golden retriever puppy playing with blue ball">
Why Alt Text Matters for SEO
Google’s John Mueller (Senior Search Analyst) has explicitly stated: “Alt text is one of the main elements we use to understand images.”
Without alt text, you’re asking Google to rank images it doesn’t understand. That’s like entering a race without legs.
The Anatomy of Perfect Alt Text
Bad alt text:
alt=""alt="image"alt="IMG_5847"alt="click here for more information"
Good alt text:
alt="Golden retriever puppy playing with blue tennis ball on grass"alt="Chocolate chip cookies cooling on wire rack"alt="MacBook Pro 16-inch displaying code editor on desk"
The Perfect Alt Text Formula
[Primary subject] + [action/context] + [relevant details]
Examples:
Image: Woman working on laptop in coffee shop Alt text: “Woman working on laptop in modern coffee shop with plants”
Image: Red sports car parked on street Alt text: “Red Ferrari F8 Tributo parked on city street at sunset”
Image: Homemade pizza Alt text: “Homemade margherita pizza with fresh basil and mozzarella”
Pro Tip: Write alt text like you’re describing the image to someone over the phone. Be specific but concise. Aim for 10-15 words. Never keyword stuff—Google penalizes that. Focus on accuracy first, SEO second.
How to Write SEO-Friendly Alt Text That Actually Ranks
Let’s get tactical. Here’s the step-by-step process for alt text optimization that drives results.
Step 1: Describe What You Actually See
Start with literal description. What’s in the image?
Bad: “Best WordPress hosting” Good: “Comparison table showing WordPress hosting prices and features”
Be honest. Describe reality.
Step 2: Add Context When Helpful
Sometimes context matters.
Image: Person holding smartphone Basic alt: “Person holding smartphone” Better alt: “Person using iPhone to scan QR code for payment”
The context (QR code payment) adds meaning.
Step 3: Include Keywords Naturally (Not Forced)
If your focus keyword naturally fits, include it. If it doesn’t, skip it.
Article about: “How to make sourdough bread” Image: Bowl of sourdough starter Alt text: “Active sourdough starter with bubbles in glass bowl” ✓
Keyword “sourdough” fits naturally.
Don’t do this: “Sourdough bread recipe sourdough starter best sourdough techniques” ✗
That’s keyword stuffing. Google hates it.
Step 4: Keep It Under 125 Characters
Screen readers cut off alt text around 125 characters. Keep it concise.
Too long: “This is a beautiful image of a golden retriever puppy with soft fluffy fur playing enthusiastically with a bright blue tennis ball on a lush green grass lawn in a suburban backyard on a sunny summer afternoon”
Just right: “Golden retriever puppy playing with blue tennis ball on grass lawn”
Step 5: Skip Decorative Images
Decorative images (design elements, spacers, borders) don’t need alt text. Use empty alt attributes:
<img src="decorative-border.png" alt="">
This tells screen readers to skip it entirely.
Alt Text for Different Image Types
Product images: Include brand, model, color, and distinguishing features. alt="Nike Air Max 270 sneakers in black and white colorway"
Infographics: Summarize the key data or message. alt="Infographic showing 5 steps to optimize WordPress speed"
Screenshots: Describe what the screenshot shows. alt="WordPress dashboard showing SEO plugin settings panel"
Charts/graphs: Describe the trend or data. alt="Line graph showing 40% increase in organic traffic over 6 months"
Pro Tip: Never start alt text with “Image of” or “Picture of.” Screen readers already announce it’s an image. Jump straight to the description. Say “Golden retriever puppy,” not “Image of a golden retriever puppy.”
For more SEO copywriting techniques, check our comprehensive WordPress SEO guide.
How to Add Alt Text in WordPress (3 Methods)
Adding alt text in WordPress is easy—once you know where to look.
Method 1: Add Alt Text When Uploading
Step 1: Click “Add Media” in WordPress editor
Step 2: Upload your image
Step 3: In the Attachment Details panel on the right, fill in “Alt Text” field
Step 4: Click “Insert into post”
Done. Alt text is now embedded in your image.
Method 2: Add Alt Text to Existing Images
Step 1: Click the image in your post
Step 2: Click the “Edit” (pencil) icon
Step 3: Add alt text in the “Alt Text” field in the sidebar
Step 4: Click “Update”
Step 5: Update your post
Method 3: Bulk Add Alt Text to Media Library
Step 1: Go to Media > Library
Step 2: Click on an image
Step 3: Edit the “Alt Text” field in the right sidebar
Step 4: Click “Update”
Repeat for all images.
For bulk optimization, use a plugin:
SEO Optimized Images (Free)
- Automatically generates alt text based on title
- Bulk optimization for existing images
- Customizable templates
Note: Auto-generated alt text is better than nothing, but manual descriptions are always better for accuracy and ranking power.
What Are the Best Image File Formats for WordPress SEO?
File format matters more than you think. The right format balances quality, file size, and browser support.
WordPress Image Format Comparison
| Format | Best For | File Size | Browser Support | Transparency | Animation |
|---|---|---|---|---|---|
| WebP | Everything (2025) | Smallest (30% smaller than JPEG) | 97%+ | ✅ Yes | ✅ Yes |
| AVIF | Next-gen (emerging) | Smallest yet | 92%+ | ✅ Yes | ✅ Yes |
| JPEG | Photos, complex images | Medium | 100% | ❌ No | ❌ No |
| PNG | Logos, transparency | Larger | 100% | ✅ Yes | ❌ No |
| SVG | Icons, simple graphics | Tiny | 100% | ✅ Yes | ✅ Yes (CSS) |
| GIF | Simple animations | Large | 100% | ✅ Yes | ✅ Yes |
The 2025 Recommendation: WebP Format
WebP is Google’s modern image format. It’s smaller, faster, and supported by all major browsers.
Benefits:
- 30% smaller than JPEG at same quality
- 25% smaller than PNG for transparencies
- Supports transparency AND animation
- Fully supported by Chrome, Firefox, Safari, Edge
When to use WebP:
- Product photos
- Blog post images
- Hero banners
- Thumbnails
- Basically everything
When to use other formats:
- SVG: Logos, icons (infinitely scalable)
- PNG: When you need 100% lossless quality
- JPEG: Legacy support for old browsers (rare in 2025)
How to Convert Images to WebP Format
Method 1: Use an Online Converter
Squoosh (Free, by Google)
- Upload image
- Select WebP format
- Adjust quality slider
- Download
Method 2: Use a WordPress Plugin
Imagify ($9.99/month)
- Automatic WebP conversion on upload
- Serves WebP to supported browsers
- Falls back to JPEG/PNG for old browsers
ShortPixel (Free 100/month)
- WebP conversion included
- CDN delivery
- Automatic format selection
Smush Pro ($7.50/month)
- WebP conversion
- Lazy loading
- CDN integration
Method 3: Manual Conversion (Advanced)
Use command-line tools like cwebp:
cwebp -q 80 input.jpg -o output.webp
Pro Tip: Always test WebP images on your site before bulk converting. Some themes or plugins don’t play nice with WebP. If images don’t display, use a plugin that provides JPEG fallbacks automatically.
How to Compress Images for WordPress Without Losing Quality
Image compression is the fastest way to dramatically improve site speed. Here’s how to do it right.
Understanding Lossy vs Lossless Compression
Lossless compression:
- Reduces file size without losing any quality
- Perfect for logos, graphics, text-heavy images
- Smaller savings (10-20% reduction)
- Use when: Quality is paramount
Lossy compression:
- Reduces file size by discarding some data
- Still looks great to human eyes
- Bigger savings (60-80% reduction)
- Use when: Photos, blog images, thumbnails
For most WordPress images, lossy compression at 80-85% quality is the sweet spot. You get massive file size reduction with imperceptible quality loss.
Best Image Compression Tools
Desktop Tools:
TinyPNG (Free online)
- Drag and drop interface
- Smart lossy compression
- Handles PNG and JPEG
- Limit: 20 images at once, 5MB each
ImageOptim (Free, Mac only)
- Batch processing
- Lossless and lossy options
- No file limits
- Simple drag-and-drop
Caesium (Free, Windows)
- Powerful compression
- Preview before/after
- Batch processing
WordPress Plugins:
| Plugin | Price | Compression | Auto-Optimize | WebP | CDN |
|---|---|---|---|---|---|
| Smush | Free / $49/yr | Lossy/Lossless | ✅ Yes | Pro only | Pro only |
| ShortPixel | Free 100/mo | Lossy/Glossy/Lossless | ✅ Yes | ✅ Yes | ✅ Yes |
| Imagify | $9.99/mo | 3 levels | ✅ Yes | ✅ Yes | ❌ No |
| EWWW Image Optimizer | Free / $7/mo | Lossy/Lossless | ✅ Yes | ✅ Yes | ✅ Yes |
| Optimole | Free / $19/mo | Adaptive | ✅ Yes | ✅ Yes | ✅ Yes |
My Recommendation: ShortPixel
Why ShortPixel wins:
- Excellent compression quality
- Fair pricing (100 images/month free)
- WebP conversion included
- CDN integration
- Bulk optimization for existing images
- Backup original images
Setup in 5 minutes:
- Install ShortPixel plugin
- Get free API key
- Choose compression level (recommend “Lossy”)
- Enable WebP conversion
- Bulk optimize existing images
The Compression Workflow
Step 1: Compress Before Uploading
Use TinyPNG or ImageOptim to pre-compress images. Reduces server load.
Step 2: Set Up Automatic Compression
Install ShortPixel or Smush. All future uploads compress automatically.
Step 3: Bulk Optimize Existing Images
Go to plugin settings > Bulk Optimization > Start. Let it process your entire media library.
Step 4: Monitor File Sizes
Check that images are under:
- Hero images: 200KB max
- Blog images: 100KB max
- Thumbnails: 30KB max
Pro Tip: Compress images to 80% quality for photos and 85% quality for graphics with text. Below 75%, quality degradation becomes visible. Above 90%, file sizes balloon with minimal quality gain. The 80-85% range is the sweet spot for most images.
Learn more about site speed optimization in our WordPress SEO complete guide.
How to Name Image Files for Better SEO
Your file name is the first thing Google sees. Make it count.
The Anatomy of an SEO-Friendly File Name
Bad file names:
IMG_5847.jpgScreenshot 2025-01-15.pngDSC_0923.jpgimage1.jpgfinal-version-2-edited.jpg
Good file names:
golden-retriever-puppy-playing-ball.jpgmacbook-pro-16-inch-desk-setup.jpgchocolate-chip-cookies-recipe.jpgwordpress-seo-dashboard-settings.jpg
The Perfect File Naming Formula
[primary-keyword]-[descriptive-words]-[specifics].jpg
Examples:
Image: Laptop on desk File name: laptop-workspace-setup-home-office.jpg
Image: Pizza File name: homemade-margherita-pizza-fresh-basil.jpg
Image: WordPress dashboard File name: wordpress-admin-dashboard-analytics-view.jpg
File Naming Best Practices
✅ Use lowercase: image.jpg not IMAGE.JPG
✅ Use hyphens, not underscores: blue-car.jpg not blue_car.jpg
✅ Be descriptive: red-ferrari-parked-street.jpg not car.jpg
✅ Include keywords naturally: If relevant, include your target keyword
✅ Keep it concise: 3-5 words is ideal
❌ Avoid special characters: No &, %, $, #, @
❌ Don’t keyword stuff: dog-puppy-cute-dogs-puppies-pet-dogs.jpg is spam
❌ Skip stop words when possible: “the,” “a,” “and” usually aren’t necessary
How to Bulk Rename Image Files
Mac: Use Automator or Renamer
Windows: Use Bulk Rename Utility
Online: Use Online Bulk Rename
WordPress plugin: Phoenix Media Rename (renames files already in Media Library)
Pro Tip: Rename images BEFORE uploading to WordPress. Once uploaded, the file name is permanent in your media library. Renaming requires plugins and can break existing links. Do it right the first time.
What Are Image Dimensions and Why Do They Matter?
Uploading a 4000px image when it displays at 800px is like shipping a car in a shipping container. Wasteful and slow.
The Right Size for Every Use Case
Full-width hero images:
- Desktop: 1920px wide
- Mobile: 800px wide (use responsive images)
- Recommended upload: 2400px wide (for retina displays)
Blog post images:
- Max display width: 800-1200px
- Recommended upload: 1600px wide (2x for retina)
Thumbnails:
- Display size: 150-300px
- Recommended upload: 400px wide
Product images:
- Main image: 2000px (for zoom functionality)
- Thumbnails: 400px
Social media sharing:
- Facebook: 1200x630px
- Twitter: 1200x675px
- LinkedIn: 1200x627px
- Pinterest: 1000x1500px
How WordPress Handles Image Sizes
WordPress automatically creates multiple versions of uploaded images:
Default sizes:
- Thumbnail: 150x150px (cropped)
- Medium: 300x300px (max dimensions)
- Large: 1024x1024px (max dimensions)
- Full: Original size
Themes and plugins add custom sizes. A typical WordPress install might generate 10-15 versions per image.
How to Set Custom Image Sizes
In WordPress settings:
- Go to Settings > Media
- Set maximum dimensions for Thumbnail, Medium, Large
- Save changes
In theme functions.php:
add_image_size('custom-size', 800, 600, true);
This creates an 800x600px cropped version.
Responsive Images with srcset
WordPress automatically generates srcset attributes for responsive images:
<img src="image-800w.jpg"
     srcset="image-400w.jpg 400w,
             image-800w.jpg 800w,
             image-1600w.jpg 1600w"
     sizes="(max-width: 600px) 400px,
            (max-width: 1200px) 800px,
            1600px"
     alt="Responsive image example">
Browsers automatically choose the right size based on screen width.
Pro Tip: Use browser DevTools to check actual display size. Right-click image > Inspect > Look at “Rendered size” vs “Intrinsic size.” If intrinsic is 3x rendered, you’re wasting bandwidth. Resize and reupload.
How to Implement Lazy Loading for WordPress Images
Lazy loading delays loading images until they’re about to enter the viewport. Massive speed improvement.
Why Lazy Loading Matters
Without lazy loading:
- Page loads 50 images immediately
- User sees only 3 images above the fold
- 47 images wasted bandwidth
- Page load time: 8 seconds
With lazy loading:
- Page loads 3 above-the-fold images immediately
- Remaining 47 images load as user scrolls
- Bandwidth saved
- Page load time: 2 seconds
Result: 75% faster initial page load.
WordPress Built-in Lazy Loading
Good news: WordPress has native lazy loading since version 5.5.
It’s automatic for all images added via the editor. No plugin needed.
Check if it’s working:
View page source. Look for images. You should see:
<img src="image.jpg" loading="lazy" alt="...">
The loading="lazy" attribute is the magic.
When Native Lazy Loading Isn’t Enough
Native lazy loading doesn’t handle:
- Background images
- Iframes (YouTube embeds)
- Custom-coded images
- CSS background images
For advanced lazy loading, use a plugin.
Best Lazy Loading Plugins
Lazy Load by WP Rocket (Free)
- Images, iframes, videos
- YouTube thumbnail placeholders
- Lightweight (no jQuery dependency)
a3 Lazy Load (Free)
- Images, videos, iframes
- Exclude specific images
- Mobile/desktop control
Jetpack (Free)
- Includes lazy loading
- Also provides CDN (paid)
- Heavy plugin (many features)
Caching plugins with lazy loading:
- WP Rocket (Premium)
- WP Fastest Cache (Free/Premium)
- LiteSpeed Cache (Free)
How to Exclude Images from Lazy Loading
Some images shouldn’t be lazy loaded:
- Above-the-fold hero images
- Logos
- Critical UI elements
To exclude in WordPress:
Add loading="eager" attribute:
<img src="hero.jpg" loading="eager" alt="Hero image">
Or use plugin settings to exclude by class or ID.
Pro Tip: Always exclude your largest above-the-fold image from lazy loading. Lazy loading it hurts Largest Contentful Paint (LCP) scores—a Core Web Vitals metric. Load the hero instantly, lazy load everything else.
For more Core Web Vitals optimization, visit our WordPress SEO optimization guide.
How to Add Image Captions and Titles Effectively
Captions and titles provide context—for users and search engines.
Image Captions
Captions appear below images. They provide context, attribution, or additional information.
SEO value:
- Google reads captions
- Users read captions (high engagement)
- Provides natural keyword opportunities
How to add captions in WordPress:
- Click image in editor
- Type in the caption field below the image
- Update post
Example: Image: Person using laptop Caption: “Remote work setup with MacBook Pro and ergonomic desk accessories”
When to use captions:
- Providing attribution
- Adding context not obvious from the image
- Explaining complex visuals (charts, diagrams)
- Including relevant keywords naturally
When to skip captions:
- Decorative images
- Self-explanatory images
- When they’d clutter the design
Image Titles
Title attributes appear on hover. They’re less important for SEO than alt text.
In WordPress:
- Click image
- Advanced settings
- Add title attribute
Most themes show image titles on hover.
SEO value: Minimal. Focus on alt text and file names instead.
Pro Tip: Don’t duplicate alt text in captions. Alt text describes the image for blind users. Captions provide additional context for sighted users. They should complement each other, not repeat.
What Is Image Schema Markup and How Does It Help SEO?
Schema markup is structured data that helps search engines understand your content. Image schema increases visibility.
Types of Image Schema
ImageObject:
{
  "@type": "ImageObject",
  "contentUrl": "https://example.com/image.jpg",
  "description": "Golden retriever puppy playing with ball",
  "name": "Golden Retriever Puppy"
}
Product images with reviews:
{
  "@type": "Product",
  "image": "https://example.com/product.jpg",
  "aggregateRating": {
    "@type": "AggregateRating",
    "ratingValue": "4.5",
    "reviewCount": "89"
  }
}
Recipe images:
{
  "@type": "Recipe",
  "image": "https://example.com/recipe.jpg",
  "name": "Chocolate Chip Cookies",
  "description": "Best homemade chocolate chip cookies"
}
How to Add Image Schema in WordPress
Method 1: Use an SEO Plugin
Rank Math (Free / $59/year)
- Automatic schema generation
- Product, recipe, article schemas
- ImageObject included
Yoast SEO (Free / $99/year)
- Schema graph output
- ImageObject for featured images
Method 2: Use Schema Plugin
Schema Pro ($79/year)
- Extensive schema types
- Custom schema templates
- Visual schema builder
Method 3: Manual JSON-LD
Add to your theme:
<script type="application/ld+json">
{
  "@context": "https://schema.org",
  "@type": "ImageObject",
  "contentUrl": "<?php the_post_thumbnail_url(); ?>",
  "description": "<?php echo get_post_meta($post->ID, '_image_description', true); ?>"
}
</script>
Pro Tip: Use Google’s Rich Results Test to validate schema markup. Go to search.google.com/test/rich-results, enter your URL, and check for errors. Fix any issues before they hurt rankings.
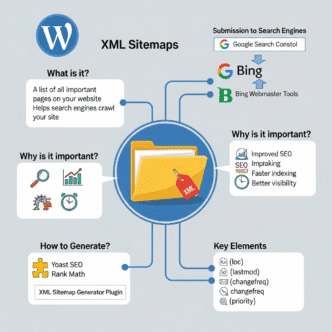
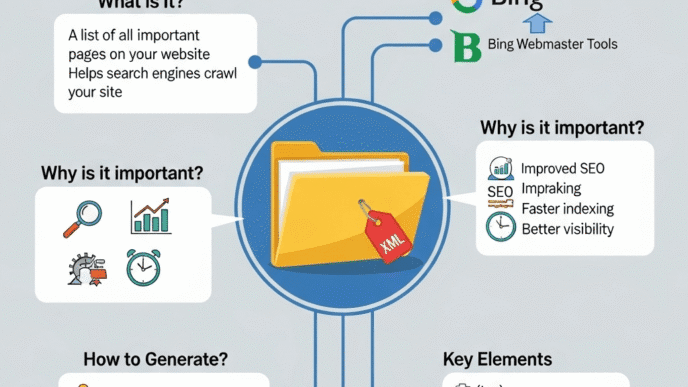
How to Use Image Sitemaps for Better Indexing
Image sitemaps tell Google about all images on your site. Result: faster indexing and better rankings.
What Is an Image Sitemap?
An image sitemap is an XML file listing all images on your site with metadata.
Example:
<url>
  <loc>https://example.com/blog-post/</loc>
  <image:image>
    <image:loc>https://example.com/image.jpg</image:loc>
    <image:caption>Golden retriever puppy playing</image:caption>
    <image:title>Golden Retriever Puppy</image:title>
  </image:image>
</url>
How to Create an Image Sitemap in WordPress
Most SEO plugins generate image sitemaps automatically:
Yoast SEO:
- Go to SEO > General > Features
- Enable XML sitemaps
- Images are included automatically
Rank Math:
- Go to Rank Math > Sitemap Settings
- Enable sitemap
- Images included by default
All in One SEO:
- Go to All in One SEO > Sitemaps
- Enable Image Sitemap
Check your image sitemap: Visit yoursite.com/image-sitemap.xml or yoursite.com/sitemap.xml (images included in main sitemap)
Submit Image Sitemap to Google
- Open Google Search Console
- Go to Sitemaps
- Enter sitemap URL
- Click Submit
Google will crawl and index your images faster.
Pro Tip: After adding new images to your site, manually request indexing in Google Search Console. Go to the URL Inspection tool, enter your page URL, and click “Request Indexing.” Your images get indexed within hours instead of days.
How to Optimize Images for Mobile Devices
58% of web traffic comes from mobile devices. If your images aren’t mobile-optimized, you’re annoying more than half your audience.
Mobile Image Optimization Checklist
✅ Use responsive images (srcset) WordPress handles this automatically, but verify in browser DevTools.
✅ Compress more aggressively for mobile Mobile users often have slower connections. Target 50-70% smaller files.
✅ Serve smaller dimensions Don’t send 2000px images to 400px screens.
✅ Lazy load everything below the fold Mobile users scroll more. Lazy loading is even more critical.
✅ Use modern formats (WebP, AVIF) Smaller files = faster mobile loading.
✅ Test on real devices Emulators lie. Test on actual phones with real connections.
Mobile-Specific Image Considerations
Viewport-relative sizing: Use CSS to make images responsive:
img {
  max-width: 100%;
  height: auto;
}
Retina display support: Serve 2x images for high-DPI screens, but keep file sizes small through compression.
Avoid horizontal scrolling: Images should never exceed viewport width on mobile.
Pro Tip: Use Chrome DevTools’ device simulation to test mobile image loading. Enable “Slow 3G” network throttling to see what users on poor connections experience. If images take 10+ seconds, you’ve got work to do.
What Are the Common WordPress Image SEO Mistakes?
Even experienced users make these mistakes. Avoid them.
1. Skipping Alt Text Entirely
The mistake: Uploading images with no alt text.
The fix: Never publish an image without alt text (unless it’s purely decorative).
2. Using Generic Alt Text
The mistake: alt="image" or alt="photo"
The fix: Be descriptive and specific.
3. Keyword Stuffing Alt Text
The mistake: `alt
=”WordPress SEO WordPress optimization best WordPress SEO plugin WordPress tips”`
The fix: Write naturally. Include keywords only when they fit the actual image content.
4. Uploading Massive Uncompressed Images
The mistake: Uploading 8MB photos straight from your camera.
The fix: Compress before uploading. Aim for under 200KB for hero images, under 100KB for standard images.
5. Using Poor File Names
The mistake: IMG_5847.jpg, screenshot.png, untitled.jpg
The fix: Descriptive, keyword-rich file names before uploading.
6. Ignoring Image Dimensions
The mistake: Uploading 5000px images that display at 400px.
The fix: Resize to 2x display size before uploading.
7. Not Using WebP Format
The mistake: Still using only JPEG/PNG in 2025.
The fix: Convert to WebP for 30% smaller file sizes.
8. Forgetting to Lazy Load
The mistake: Loading 50 images on page load when users see 3.
The fix: Enable lazy loading (native or plugin).
9. No Image Sitemap
The mistake: Not submitting images to Google Search Console.
The fix: Generate image sitemap via SEO plugin and submit to GSC.
10. Hosting Videos Directly on WordPress
The mistake: Uploading 100MB video files to your server.
The fix: Host videos on YouTube/Vimeo and embed. Videos destroy server resources and page speed.
Pro Tip: Audit your site with Screaming Frog SEO Spider (free for 500 URLs). It identifies images missing alt text, oversized files, and other issues. Fix the biggest problems first for maximum impact.
How AI and Google Lens Are Changing Image SEO
The image SEO landscape is evolving rapidly with AI search and visual recognition technology.
Google Lens and Visual Search
Google Lens uses AI to identify objects, text, and context in images. It powers:
- Google Image Search
- Google Shopping visual search
- “Search with camera” features
What this means for image SEO:
1. Image quality matters more Blurry, pixelated images won’t be recognized accurately.
2. Context is critical Google understands objects in images and matches them to search queries.
3. Text in images is readable Google extracts text from images. Make sure it’s relevant and legible.
4. Surrounding content matters The page content around images helps Google understand image context.
AI Search Engines and Images
ChatGPT, Perplexity, and Google’s SGE pull images from indexed content.
How to optimize for AI search:
✅ Use descriptive file names and alt text AI scrapes this data to understand images.
✅ Provide context around images Write captions, surrounding paragraphs that explain the image.
✅ Use structured data (schema markup) Helps AI parse and categorize images.
✅ Maintain high image quality AI prioritizes clear, professional images.
✅ Keep images relevant to content Don’t use stock photos unrelated to your topic. AI detects relevance.
The Future: AI-Generated Alt Text
AI tools are getting better at generating alt text:
Microsoft Azure Computer Vision (Paid)
- Automatically generates image descriptions
- 99%+ accuracy for common objects
WordPress plugins using AI:
ImageSEO ($29/month)
- AI-generated alt text
- Multi-language support
- Bulk optimization
AltText.ai (Pay-per-image)
- WordPress plugin available
- Accurate AI descriptions
- Human review option
Pro Tip: AI-generated alt text is good but not perfect. Use it as a starting point, then manually refine for accuracy and keyword optimization. AI might say “dog,” but you want “golden retriever puppy”—specificity matters.
For more on AI’s impact on SEO, explore our complete WordPress SEO guide.
Real-World Case Study: Image SEO That Tripled Traffic
Let me show you these techniques in action with a real client example.
The Problem
Client: Interior design blog Monthly traffic: 12,000 visits Image strategy: Nonexistent
Issues found:
- 800+ images with no alt text
- Average image size: 2.5MB (uncompressed)
- File names like
IMG_2847.jpg - No lazy loading
- JPEG format only
- No image sitemap
Page load time: 9.7 seconds Google PageSpeed score: 28/100
The Solution (Step-by-Step)
Week 1: Foundation
Installed ShortPixel plugin
- Bulk compressed all 800 images
- Average 78% size reduction
- Converted to WebP format
- Result: Average image size dropped from 2.5MB to 180KB
Enabled lazy loading via WP Rocket
- Configured to load images 200px before viewport
- Result: Initial page load reduced from 9.7s to 4.2s
Week 2: Alt Text and File Names
Wrote alt text for all 800 images
- Used formula: [room type] + [style] + [key features]
- Example: “Modern minimalist living room with gray sofa and brass accents”
- Naturally included keywords like “living room ideas,” “minimalist design”
- Time investment: 8 hours (10 images/hour)
Bulk renamed images using Phoenix Media Rename plugin
- Changed
IMG_2847.jpgtomodern-minimalist-living-room-gray-sofa.jpg - Used SEO-friendly, descriptive names
- Changed
Week 3: Technical Optimization
Created image sitemap via Rank Math
- Submitted to Google Search Console
- Requested indexing for top 50 pages
Added image schema markup
- Enabled ImageObject schema in Rank Math
- Added schema to all posts
Optimized responsive images
- Verified srcset attributes were working
- Set proper image dimensions in settings
The Results (6 Months Later)
Traffic:
- From: 12,000 monthly visits
- To: 41,000 monthly visits
- Growth: +242% (nearly tripled)
Google Images traffic:
- From: 800 visits/month (7% of total)
- To: 14,000 visits/month (34% of total)
Page speed:
- Load time: 9.7s → 1.8s
- PageSpeed score: 28 → 92
Search visibility:
- Images ranking in top 10: Increased from 23 to 340+
- Featured in image carousels: 78 queries
Revenue impact:
- Affiliate commissions: +156% (more traffic = more clicks)
- Ad revenue: +198% (better page speed = more pages/session)
Key Takeaways
The biggest wins came from:
- Image compression (4MB → 180KB average)
- Alt text optimization (0% → 100% coverage)
- Lazy loading (9.7s → 1.8s load time)
Total time investment: ~20 hours Total cost: $59/year (ShortPixel) ROI: Massive traffic increase that continues growing
The lesson: Image SEO isn’t optional. It’s a traffic multiplier hiding in plain sight.
Advanced WordPress Image SEO Techniques
Ready to go beyond the basics? Here are advanced tactics.
1. Use Image CDN for Global Delivery
What is an image CDN? A Content Delivery Network optimized specifically for images. It automatically:
- Resizes images for different devices
- Converts to optimal formats
- Serves from nearest location
- Caches aggressively
Top Image CDNs:
Cloudinary (Free / $99+/month)
- Automatic format conversion
- On-the-fly resizing
- AI-powered optimization
- WordPress plugin available
Imgix (From $10/month)
- Real-time image processing
- Advanced optimization
- Developer-friendly API
ImageKit (Free / $49+/month)
- Image transformation
- WebP/AVIF support
- Global CDN
BunnyCDN ($1/month + usage)
- Affordable
- Image optimization included
- Fast global delivery
2. Implement Critical CSS for Above-Fold Images
Critical CSS inlines the CSS needed to render above-the-fold content—including images.
Result: Hero images load instantly, even on slow connections.
How to implement:
- Use WP Rocket’s critical CSS feature (automatic)
- Or use Autoptimize with Critical CSS Power-Up
3. Preload Hero Images
Preloading tells browsers to download critical images immediately.
Add to your theme’s <head> section:
<link rel="preload" as="image" href="hero-image.jpg">
Or use WP Rocket’s media preload feature.
Result: Largest Contentful Paint (LCP) improvement.
4. Use Progressive JPEGs
Progressive JPEGs load in multiple passes—low quality first, then higher quality.
Benefits:
- Perceived faster loading
- Better user experience
- Same file size as baseline JPEGs
How to create: Most image compression tools have “progressive” options. Enable it.
5. Implement Image Placeholder Strategies
LQIP (Low-Quality Image Placeholder): Show a tiny, blurred version while full image loads.
Dominant color placeholder: Show average color of image while loading.
SVG trace placeholder: Show outline/trace of image while loading.
Plugins:
- Blur Lazy Load (LQIP)
- Lazy Load – Optimize Images (multiple strategies)
6. Monitor Image Performance with Real User Data
Use Google Analytics 4 to track:
- Time to interactive
- Largest Contentful Paint
- Cumulative Layout Shift
Set up custom events for image loading: Track how long images actually take to load for real users.
Pro Tip: Use Google’s PageSpeed Insights to test individual pages. Look specifically at the “Opportunities” section for image-specific recommendations. Address the largest opportunities first—they have the biggest impact.
For comprehensive technical SEO strategies, visit our WordPress SEO complete guide.
WordPress Image SEO Plugins: Complete Comparison
Let’s compare the top image optimization plugins side-by-side.
| Plugin | Price | Compression | WebP | Lazy Load | CDN | Alt Text | Best For |
|---|---|---|---|---|---|---|---|
| ShortPixel | Free 100/mo, $4.99+/mo | Lossy/Glossy/Lossless | ✅ Yes | ✅ Yes | ✅ Yes | ❌ No | Best overall value |
| Smush Pro | $7.50/mo | Lossy | ✅ Pro only | ✅ Yes | ✅ Pro only | ❌ No | WPMU Dev members |
| Imagify | $9.99/mo | 3 levels | ✅ Yes | ✅ Yes | ❌ No | ❌ No | Simple, powerful |
| EWWW Image Optimizer | Free / $7/mo | Lossy/Lossless | ✅ Yes | ✅ Yes | ✅ Yes | ❌ No | Privacy-focused |
| Optimole | Free / $19/mo | Adaptive | ✅ Yes | ✅ Yes | ✅ Yes | ❌ No | Automatic everything |
| Jetpack | Free / $3.95+/mo | ❌ No | ❌ No | ✅ Yes | ✅ Paid | ❌ No | Jetpack users only |
My Top 3 Recommendations
Best Overall: ShortPixel
- Excellent compression quality
- Fair pricing
- WebP conversion
- Bulk optimization
- Great support
Best Free Option: EWWW Image Optimizer
- Powerful free version
- Local processing (privacy)
- WebP support
- No monthly limits
Best for Simplicity: Optimole
- Zero configuration
- Adaptive optimization
- Handles everything automatically
- Worth the price for beginners
Your 30-Day WordPress Image SEO Action Plan
Feeling overwhelmed? Here’s a step-by-step 30-day plan.
Week 1: Foundation (Hours 1-5)
Day 1-2: Audit current images
- Install Query Monitor plugin
- Check how many images lack alt text
- Identify oversized images (over 500KB)
- List the biggest problems
Day 3-4: Install optimization tools
- Install ShortPixel or Smush
- Enable automatic compression
- Convert to WebP format
- Run bulk optimization on existing images
Day 5-7: Enable lazy loading
- Install Lazy Load plugin (if not using caching plugin)
- Enable lazy loading
- Exclude hero images
- Test on mobile devices
Week 2: Alt Text and File Names (Hours 6-15)
Day 8-12: Write alt text
- Start with most-viewed pages
- Write descriptive, keyword-rich alt text
- Use the formula: [subject] + [action/context] + [details]
- Aim for 10-15 images per day
Day 13-14: Optimize file names
- Install Phoenix Media Rename plugin
- Rename existing images with descriptive names
- Create naming convention for future uploads
Week 3: Technical Optimization (Hours 16-20)
Day 15-17: Image dimensions
- Audit image sizes with Screaming Frog
- Identify oversized images
- Resize and reupload largest offenders
Day 18-19: Create image sitemap
- Enable image sitemap in SEO plugin
- Submit to Google Search Console
- Request indexing for key pages
Day 20-21: Add schema markup
- Enable ImageObject schema in Rank Math/Yoast
- Verify with Google Rich Results Test
- Fix any errors
Week 4: Monitoring and Maintenance (Hours 21-25)
Day 22-24: Performance testing
- Run PageSpeed Insights on key pages
- Check Core Web Vitals scores
- Optimize pages with poor LCP scores
Day 25-27: Mobile optimization
- Test on real devices
- Verify responsive images work
- Check lazy loading on mobile
Day 28-30: Set up monitoring
- Schedule monthly image audits
- Set up Google Search Console alerts
- Create optimization checklist for new images
Beyond 30 Days: Maintenance
Monthly tasks:
- Bulk optimize new images
- Check for missing alt text
- Monitor page speed scores
- Review Google Images traffic in Analytics
Quarterly tasks:
- Full site image audit
- Update old images with better compression
- Test new optimization techniques
- Review and update alt text for better keywords
Pro Tip: Don’t try to fix everything at once. Focus on your top 10-20 highest-traffic pages first. Optimize those images perfectly, measure results, then move to the next batch. Small wins compound into massive improvements.
Final Thoughts: Making Image SEO a Habit
WordPress image SEO isn’t a one-time task—it’s an ongoing practice that compounds over time.
Every optimized image is an investment that pays dividends for years. Every alt text you write creates a new pathway for traffic. Every compression saves milliseconds that add up to better rankings.
The beautiful part? Most of your competitors are ignoring this. They’re uploading massive images with no alt text and wondering why their site is slow and their traffic is stagnant.
You now know better.
You understand:
- How to write alt text that ranks
- How to compress images without losing quality
- How to implement lazy loading for speed
- How to name files for SEO
- How to use WebP format for smaller sizes
- How to create image sitemaps for better indexing
Start simple:
- Compress every new image before uploading
- Write descriptive alt text for every image
- Use SEO-friendly file names
- Enable lazy loading
Master those four, and you’re ahead of 80% of WordPress users.
The rest—WebP conversion, CDNs, schema markup—comes with time.
Remember: Google Images is a traffic goldmine most people ignore. Your competitors are leaving money on the table. Don’t be like them.
Optimize your images. Watch your traffic grow. Enjoy the results.
Now stop reading and start optimizing. Your images are waiting to rank.
For comprehensive SEO strategies beyond images, bookmark our complete WordPress SEO guide.
Frequently Asked Questions (FAQs)
What is the best image format for WordPress SEO?
WebP format is the best choice in 2025. It’s 30% smaller than JPEG at the same quality, supports transparency like PNG, and has 97%+ browser support. Use ShortPixel or Imagify to automatically convert images to WebP. For logos and icons, use SVG for infinitely scalable vector graphics.
How long should image alt text be?
Alt text should be 10-15 words or under 125 characters. Screen readers cut off longer descriptions, and Google prioritizes concise, accurate descriptions. Focus on describing what’s actually in the image rather than writing paragraphs.
Do image file names really affect SEO?
Yes. Image file names are one of the first signals Google uses to understand image content. Use descriptive, keyword-rich names like golden-retriever-puppy-playing.jpg instead of IMG_5847.jpg. Rename images before uploading to WordPress—changing file names after upload requires plugins.
Should I lazy load all images?
No. Exclude above-the-fold images from lazy loading, especially your hero image. Lazy loading above-the-fold images hurts Largest Contentful Paint (LCP) scores—a Core Web Vitals metric. Lazy load everything below the fold for maximum speed benefit.
What’s the ideal image size for WordPress?
Hero images: Upload at 2400px wide, compress to under 200KB. Blog images: Upload at 1600px wide, compress to under 100KB. Thumbnails: Upload at 400px wide, compress to under 30KB. Always resize to 2x the display size for retina displays, then compress aggressively.
Can I use AI to generate alt text?
Yes, but with caution. AI tools like ImageSEO or AltText.ai generate accurate descriptions for common objects, but manual refinement is essential. AI might say “dog” when you want “golden retriever puppy”—specificity matters for SEO. Use AI as a starting point, then add keywords and context.
How do I compress images without losing quality?
Use lossy compression at 80-85% quality. This sweet spot reduces file size by 60-80% with imperceptible quality loss. Use plugins like ShortPixel, Imagify, or Smush, or online tools like TinyPNG. Below 75% quality, degradation becomes visible. Above 90%, file sizes balloon unnecessarily.
What’s the difference between image title and alt text?
Alt text describes image content for blind users and search engines (critical for SEO). Title text appears on hover for sighted users (minimal SEO value). Focus your effort on writing great alt text. Never duplicate alt text in title fields—they serve different purposes.
How often should I optimize images?
New images: Compress and add alt text before uploading—every time. Existing images: Bulk optimize once, then audit quarterly for missing alt text or oversized files. Monthly maintenance: Check for images missing alt text using Screaming Frog or Query Monitor plugin.
Does WordPress automatically optimize images?
Partially. WordPress automatically creates multiple sizes (thumbnail, medium, large) and adds srcset for responsive images. It also includes native lazy loading since version 5.5. However, WordPress does NOT compress images, convert to WebP, or add alt text—you must handle those manually or with plugins.
This comprehensive guide gives you everything needed to master WordPress image SEO—from foundational alt text writing to advanced CDN implementation. Apply these strategies systematically, and watch your image search traffic soar while your page speed improves dramatically.